
CSV Import is itself a powerful tool that NetSuite implementation provides for mass creation/updating a specific record type in huge volume. This feature is mostly used when we need to import data from an external source into NetSuite implementation. Users can perform this Netsuite product upload task without any technical hands-on experience, and with a minimum training program.
But sometimes our clients want digital transformation to automate the process without human intervention. Let’s say the requirement is to import all CSV files sitting in a specific folder every two hours OR Get CSV files from an external server and process CSV Import twice every day.
In such conditions, our NetSuite Consulting Services providers build customizations to automate these processes with the help of SuiteScript.
NetSuite implementation thankfully provides us a feature to perform that task using SuiteScript in every SuiteScript version. But for every version of this API, we found a few limitations as well.
So here we will discuss achieving CSV Import through SuiteScript with different versions and limitations of each version and when and where to use a certain specific version in detail.
Before we create SuiteScript to perform CSV Import, we need to create a “Saved CSV Import” record.
Creation of Saved CSV Import Record:
For that Got To Setup > Import/Export > Import CSV Record
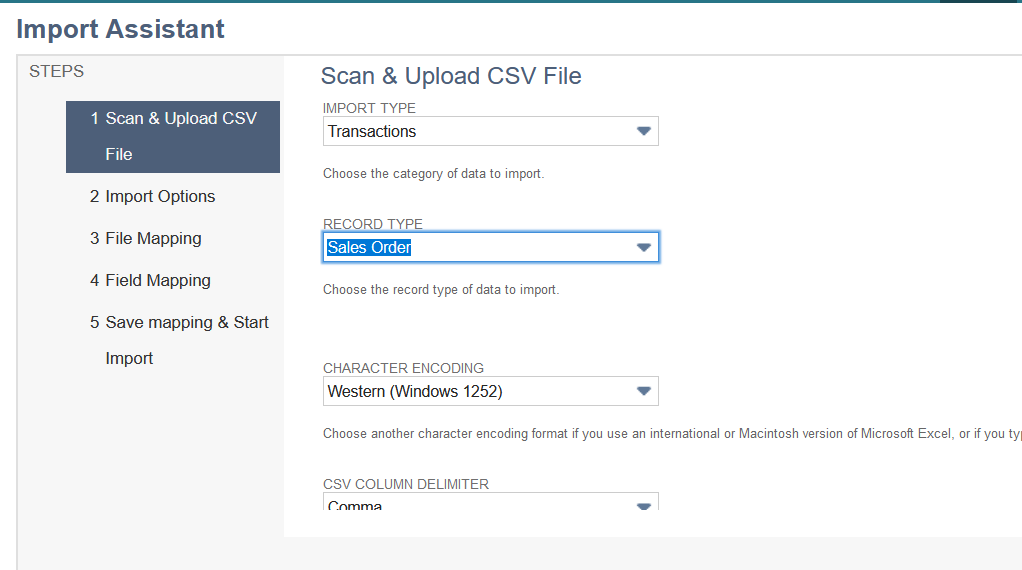
Step 1: Select Import Type, Record Type, and other file-related setup. Select the sample CSV file to further map file columns with NetSuite record fields.
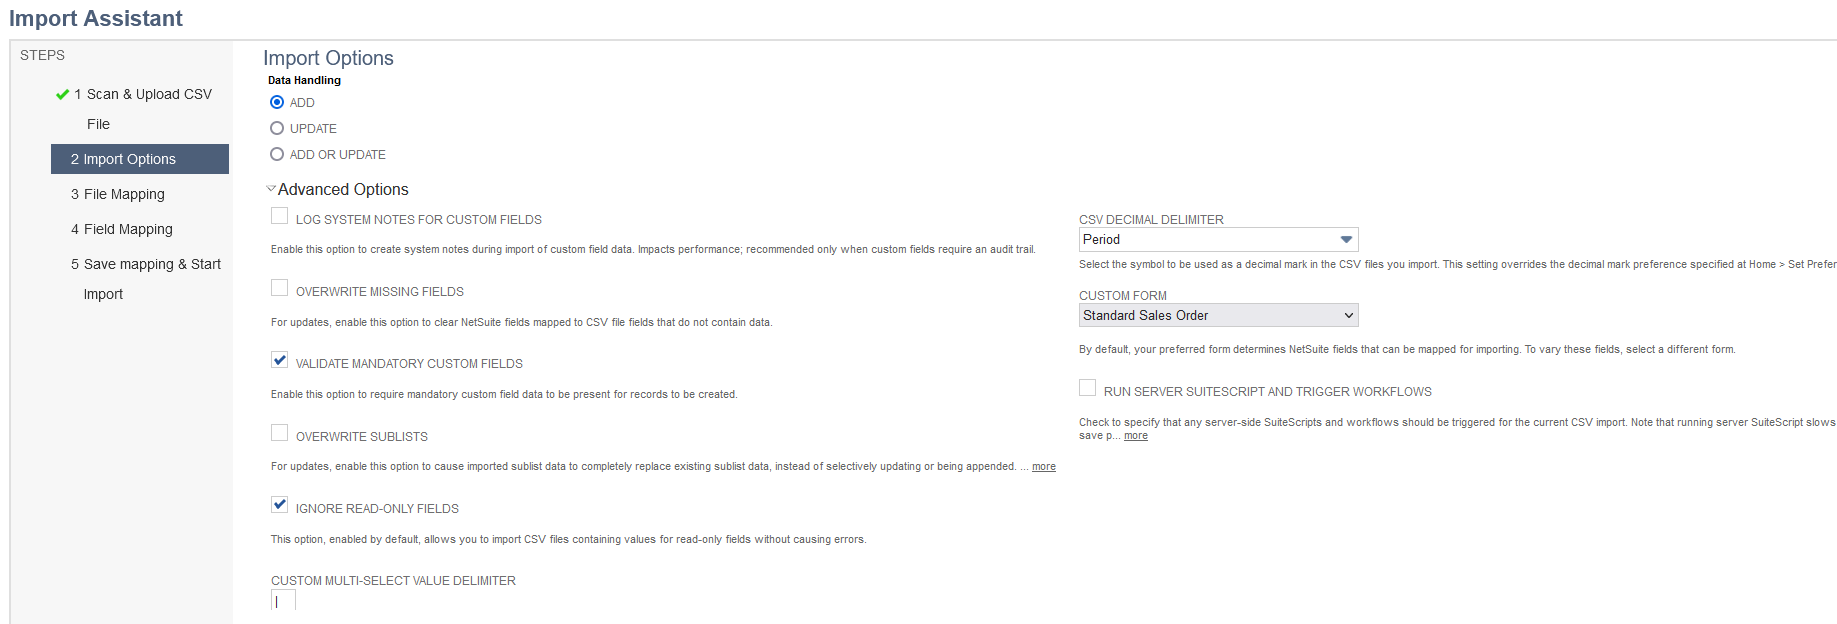
Step 2: Click “NEXT” and select Import options among “Add”, “Update” & “Add OR Update” as per your requirement.
ADD: To create a new record.
UPDATE: Update existing records
ADD OR UPDATE: If a record exists, then update the existing record, else create a new record.
Step 3: There are a few more setups under “Advanced Options” that can be set like:
- Validate Mandatory Custom Fields: Enable this option to require mandatory custom field data to be present for records to be created.
- Overwrite Sublists: For updates, enable this option to cause imported sublist data to completely replace existing sublist data, instead of selectively updating or being appended.
- Run Server SuiteScript and trigger WorkFlows: Check to specify that any server-side SuiteScripts and workflows should be triggered for the current CSV import. Note that running server SuiteScript slows the save process and some more.
Step 4: Click next and set mapping fields between CSV file columns and NetSuite record fields as per your requirement.
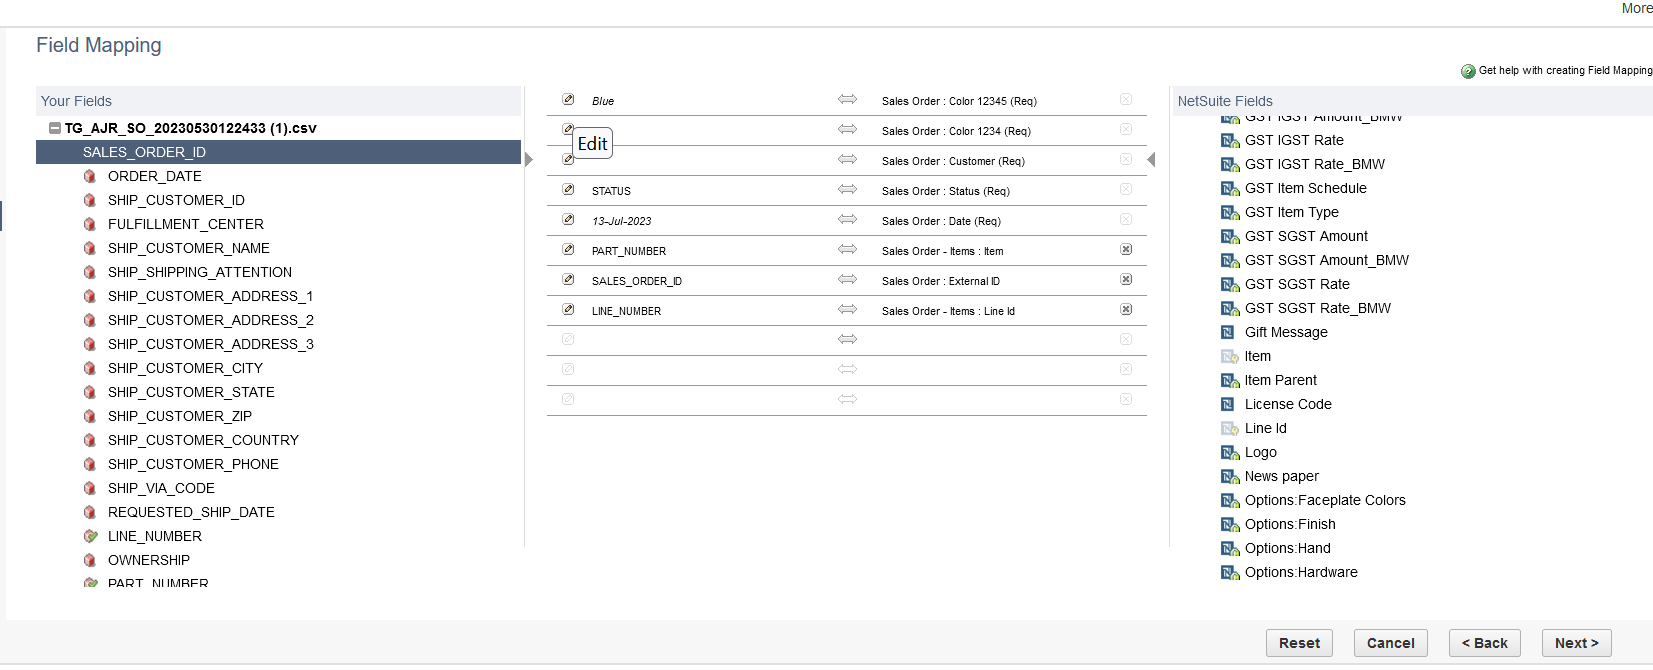
The left-hand table holds all columns from the CSV file whereas the right-hand table contains NetSuite record fields. The middle table is for mapping fields between the CSV file and the NetSuite record. You can set the default value to a NetSuite field by selecting the pencil icon as shown in the above image.
Step 5: Click next and Give the Name and ID for the saved CSV Import record and then Save and Run to save that. So now our Saved CSV Import record is ready.
The next step is to create a script.
So, let’s see how to do CSV Import using SuiteScript in all 3 versions.
SuiteScript 1.0
Script Name: SS_CSVimport_V_1_0.js
function RecordUpdateByCSVImport(){
//Load File
var fileObj = nlapiLoadFile(“12345”);
var fileName = fileObj.name;
nlapiLogExecution(‘DEBUG’, ‘fileName’, fileName);
//Create CSV Import Task
var job = nlapiCreateCSVImport();
job.setMapping(“custimport_test_csvimport”);
job.setPrimaryFile(fileObj);
job.setOption(“jobName”, “CSV_Import_”+fileName);
var responseCode = nlapiSubmitCSVImport(job);
nlapiLogExecution(‘DEBUG’, ‘TASK ID’, responseCode);}
SuiteScript 2.0:
Script Name: SS_CSVimport_V_2_0.js
/**
@NApiVersion 2.0
@NScriptType ScheduledScript
*/
define(“N/file”, “N/record”, “N/task”, function (file, record, task){
function RecordUpdateByCSVImport(scriptContext){
// load the file var fileObj = file.load(“12345”);
var fileName = fileObj.name;
log.debug({ title: “fileName:”, details: fileName });
var today = new Date();
//Create t ask for savedCSVimport for loaded file Object
var importTask = task.create({
taskType: task.TaskType.CSV_IMPORT,
mappingId: custimport_test_csvimport,
importFile: fileObj,
name: fileName + “_” + today
});
//Submit the task
var csvImportTaskId = importTask.submit();
log.debug({ title: “csvImportTaskId:”, details: csvImportTaskId });
//Get task status
var csvTaskStatus = task.checkStatus({ taskId: csvImportTaskId });
log.debug({ title: “csvTaskStatus:”, details: csvTaskStatus });
if (csvTaskStatus.status == task.TaskStatus.COMPLETED)
log.debug(“Import Task completed for fileId = ” + fileId, “TASK finished”);}
return {
execute: RecordUpdateByCSVImport
}
});
SuiteScript 2.1:
Script Name: SS_CSVimport_V_2_1.js
/**
- @NApiVersion 2.1
- @NScriptType ScheduledScript
*/
let N_FILE = {};
let N_RECORD = {};
let N_SEARCH = {};
let N_TASK = {};
let DEFINE_ARRAY = [];
DEFINE_ARRAY.push(“N/file”);
DEFINE_ARRAY.push(“N/record”);
DEFINE_ARRAY.push(“N/search”);
DEFINE_ARRAY.push(“N/task”);
DEFINE_ARRAY.push(“N/runtime”);
define(DEFINE_ARRAY,
(file, record, search, task, runtime) => {
N_FILE = file;
N_RECORD = record;
N_SEARCH = search;
N_TASK = task;
const execute = (scriptContext) => {
// load the file
let fileObj = N_FILE.load(“12345”);
let fileName = fileObj.name;
var today = new Date();
//Create task for savedCSVimport for loaded file Object
let importTask = N_TASK.create({
taskType: N_TASK.TaskType.CSV_IMPORT,
mappingId: custimport_test_csvimport,
importFile: fileObj,
name: fileName+ “_CSVIMport_” + today
});
//Submit the task
let csvImportTaskId = importTask.submit();
log.debug({ title: “csvImportTaskId:”, details: csvImportTaskId });
//Get task status
let csvTaskStatus = N_TASK.checkStatus({
taskId: csvImportTaskId
});
log.debug({ title: “csvTaskStatus:”, details: csvTaskStatus });
if (csvTaskStatus.status == N_TASK.TaskStatus.COMPLETED)
log.debug(“Import Task completed for fileId = ” + fileId, “Task Completed”);}
return { execute } });
Now that we have scripts both in 1.0 & 2.0, let’s compare the two versions by checking what features are provided in each version and what is missing.
| SuiteScript 1.0 | SuiteScript 2.0 |
| You will get Task ID in Numeric format in the response code. | You will get a task ID as a combination of some random characters on submitting the task. |
| Task ID can be used to get the CSV Response File link. | This task ID can’t be used to get the CSV Response File link. |
| You can’t check the status of the job in this version. | Provides API to check the status of the task. But here is one problem, the Status says “COMPLETED”, even if the CSV Import is not successful. We will discuss it more below. |
As we have shown features available/not available in each version, Now we will discuss how to decide which version of code we should use for our NetSuite implementation.
To answer this question, let’s analyze different scenarios:
Scenario 1:
If the requirement is just to execute CSV Import through the script, and the client is not worried about responses/status, then you can go with either version.
Scenario 2:
If the requirement is that the user wants to know about the ‘Response’ details like, whether all records are imported correctly or not, and they want to check that by downloading the response file, you should go ahead with SuiteScript 1.0.
Also, note that SuiteScript 1.0 doesn’t give you task status details. While sending a Response file link, let the user know, she/he may need to wait for some time to download the response file, in case she/he gets any error.
Scenario 3:
If the requirement is like this, send an update email or do something else, once the CSV Import job is finished, then go ahead with SuiteScript 2.0.
NOTE 1: Irrespective of whether the CSV Import creates/updates all records successfully or not, we get the status code “COMPLETED”. So, status won’t help much to update users about if all records are updated correctly or not.
NOTE 2: There is an enhancement ticket() raised for adding a feature to SuiteScript 2.0 to provide APIs for downloading CSV response files. Please vote for that, so that we can have the feature earlier. Enhancement details: Enhancement 366617: SuiteScript: Import/Export > View CSV Import Status > Ability to get the CSV Response files using a script and store them in a file cabinet
We are hoping to see some amazing features that NetSuite has in the near future related to CSV Import using SuiteScript.